Unity 에서 레이캐스트용 Job 객체가 있습니다.
RaycastCommand 라는 객체인데 이것의 성능을 테스트 하기 위해 실험을 해 보았습니다.

0.1도 단위로 Ray를 쏴서 성능 비교를 진행 하였습니다.
Update()문에서 일반 Physhics.RaycastNonAlloc 으로 처리된것과 RaycastCommand로 처리한 것을 비교 해 보았습니다.
for (int i = 0; i < totalRay; ++i)
{
    float angle = stepSize * i;
    float rad = angle * Mathf.Deg2Rad;
    Vector3 direction = new Vector3(Mathf.Sin(rad), 0, Mathf.Cos(rad));
    Ray ray = new Ray(this.transform.position, direction);
    RaycastHit[] hits = new RaycastHit[1];
    Physics.RaycastNonAlloc(ray, hits, distance, LayerMask.GetMask("Target"));

    if (hits[0].collider != null)
    {
        Debug.DrawLine(this.transform.position, hits[0].point, Color.blue, 0.1f);
    }
    else
    {
        Debug.DrawLine(this.transform.position, (this.transform.position + (ray.direction * distance)), Color.red, 0.1f);
    }
}
일반 처리로 처리 한 부분입니다.
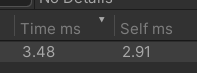
Update() 전체를 프로파일러로 체크 하였고 결과는 다음과 같습니다.

화면에 박스 하나만 있는 경량의 테스트 이기 때문에 실제상황보다는 훨씬 적은 비용을 소모 할 것이라고 생각합니다.
다음은 RaycastCommand를 활용한 부분 입니다.
for (int i = 0; i < totalRay; ++i)
{
    float angle = stepSize * i;
    float rad = angle * Mathf.Deg2Rad;
    Vector3 direction = new Vector3(Mathf.Sin(rad), 0, Mathf.Cos(rad));
    _raycastCommands[i] = new RaycastCommand(this.transform.position, direction, distance, LayerMask.GetMask("Target"));
}

JobHandle handle = RaycastCommand.ScheduleBatch(_raycastCommands, _raycastHits, totalRay);

handle.Complete();

for (int i = 0; i < totalRay; ++i)
{
    if (_raycastHits[i].collider != null)
    {
        Debug.DrawLine(this.transform.position, _raycastHits[i].point, Color.blue, 0.1f);
    }
    else
    {
        Debug.DrawLine(this.transform.position, (transform.position + (_raycastCommands[i].direction * distance)), Color.red, 0.1f);
    }
}
RaycastCommand 를 사용할때는 NativeArray를 사용 해야 하며 결과값 역시 NativeArray<RaycastHit>를 사용해서 받아 주어야 합니다.
기존 다른 IJob의 상속들 처럼 따로 구조체를 만드는 것이 아니라 RaycastCommand 자체로 ScheduleBatch를 돌릴 수 있습니다.
역시 마찬가지로 Update()에서 돌렸고 전체를 프로파일링 해 봤습니다.

대략 0.91ms 가 줄었고 기존 대비 14%정도 성능 향상이 있다고 생각 됩니다.
물론 Raycast를 0.1단위로 할 일도 없고 성능 비교를 위하여 극단적으로 처리 한 결과 입니다.
여기서 드는 의문중 하나가 RaycastCommand 를 구성하기 위하여 계산하는 부분이 있는데 이 부분 마저 Job으로 처리하면 어떻게 될까 하는 의문이 들었습니다.
https://aostols.tistory.com/12
Unity Job System - 종속성
Unity 에서는 멀티 스레딩을 지원 하기 위해서 Job System을 제공 하고 있습니다. https://docs.unity3d.com/kr/2018.4/Manual/JobSystem.html C# 잡 시스템 - Unity 매뉴얼 Unity C# 잡 시스템(Job System)을 사..
aostols.tistory.com
제가 이전에 Job의 종속성도 확인 했었는데 같은 맥락일 것이라고 생각되어 실험 해 보았습니다.
public struct SetRaycastJob : IJobParallelFor
{
    public Vector3 Diection;
    public Vector3 Start;
    public float StepSize;
    public float Distance;
    public NativeArray<RaycastCommand> RaycastCommands;
    public LayerMask LayerMask;

    public void Execute(int index)
    {
        float angle = StepSize * index;
        float rad = angle * Mathf.Deg2Rad;
        Diection = new Vector3(Mathf.Sin(rad), 0, Mathf.Cos(rad));
        RaycastCommands[index] = new RaycastCommand(Start, Diection, Distance, LayerMask);
    }
}

var setRaycastJob = new SetRaycastJob()
{
    StepSize = stepSize,
    Distance = distance,
    RaycastCommands = _raycastCommands,
    Start = transform.position,
    LayerMask = _layerMask
};

var setHandle = setRaycastJob.Schedule(totalRay, 1);
var rayHandle = RaycastCommand.ScheduleBatch(_raycastCommands, _raycastHits, totalRay, setHandle);
rayHandle.Complete();
for (int i = 0; i < totalRay; ++i)
{
    if (_raycastHits[i].collider != null)
    {
        Debug.DrawLine(this.transform.position, _raycastHits[i].point, Color.blue, 0.1f);
    }
    else
    {
        Debug.DrawLine(this.transform.position, (transform.position + (_raycastCommands[i].direction * distance)), Color.red, 0.1f);
    }
}
계산 하는 부분을 IJobParallelFor로 만들어서 계산을 돌렸습니다.
그 이후 계산된 결과를 RaycastCommand에 넣고 이것을 다시 RaycastCommand.ScheduleBatch로 돌렸습니다.
여기서 종속성을 걸어 버렸고 라인 그리는 부분은 동일 합니다.
결과는 조금 더 줄일 수 있었습니다.
2.54ms 가 줄어 RaycastCommand만 썻을 때 대비 46%가 줄어 든 것을 확인하였습니다.
최초 Update()를 그냥 돌리는 것 대비 54% 줄어 든 것을 확인 하였습니다.
복잡하다면 복잡할 수 있지만 실제 사용 한다면 확실한 이득을 얻을 수 있을거라 생각됩니다.
'Unity Engine' 카테고리의 다른 글
| Behavior Tree - Node Canvas (2) (3) | 2022.07.02 |
|---|---|
| Behavior Tree - Node Canvas (1) (0) | 2022.06.29 |
| Custom Inspector - ReorderableList(2) (1) | 2022.06.20 |
| Custom Inspector - ReorderableList(1) (1) | 2022.06.15 |
| Unity Job System - 종속성 (0) | 2022.05.11 |